This seems simple but, to me, it took a while to figure out how to achieve this. So I thought I should write a post for other guys out there trying to get same results.
No more talking. Let's get started!!
NOTE: I assume that you have InfoPath Form published on a SharePoint site with Submit functionality enabled.
Our Scope is: We want to show the Submit button only for the very first time when the form is being filled by user. Once user submit the form, the Submit button will not be shown ever if the form is opened again.
Below are the steps to achieve this:
No more talking. Let's get started!!
NOTE: I assume that you have InfoPath Form published on a SharePoint site with Submit functionality enabled.
Our Scope is: We want to show the Submit button only for the very first time when the form is being filled by user. Once user submit the form, the Submit button will not be shown ever if the form is opened again.
Below are the steps to achieve this:
-
Every InfoPath Form with submit functionality enabled has Submit, Save, Save As and etc. buttons by default in the Ribbon.

-
To achieve what we want, we need to get rid of Submit Button from the Ribbon. To do so, open your form in InfoPath Designer and do as follows-
-
Goto File > Advanced form options > Web Browser > Uncheck Submit

-
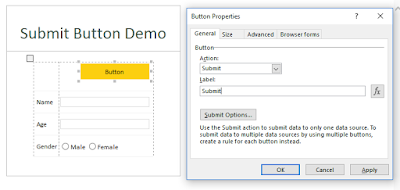
Add a Button Control at the top of your page. Right click on it and set the values as shown below:
Hit OK.
-
Add a New Field from fields toolbox.To do so, right click on myfields node > Add > use setting as shown below:

-
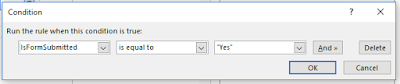
Add Formatting Rule to your button. Use below Condition:
Hit OK. Check the checkbox "Hide this control"
-
Publish (not Quick Publish) your form again. Add New Field as column when it asks. Make sure you check "Allow user to edit data in this field by using a datasheet or property page."

-
Add a Workflow that starts whenever an Item is Created. Use the following statements:
Publish Worklfow.

-
Goto File > Advanced form options > Web Browser > Uncheck Submit
- You are all set! Try to submit your form and open it again. Submit button is gone.


